Shabby Miss Jenn

Saturday, February 16, 2013

Homemade Donuts!

I have been seeing these homemade donuts come across my Pinterest the last few weeks.  My mama must have been cool before her time, because she used to make these on quiet weekend afternoons when my four siblings and I were growing up.

Here's what you need... 
  • a tube of homestyle refrigerator biscuits.  Any size or brand works.
  • Vegetable oil 
  • Sugar
  • a 1/2 inch or a 1 inch round cutter (optional)
My mom would do all the frying...we would cut the raw biscuits.  We used an old thimble to cut the centers out.  Nowadays I  have a tiny round cutter that came in a set of fondant cutters.  If you don't have some sort of cutter...you can always cut the raw biscuits into fourths and fry them that way.


Put about .5 inch of oil into a sauce pan (I wouldn't use a fry pan unless it has high sides).

Heat up the oil on about medium heat... Don't let it get too hot or you will not be able to keep up with the cooking speed! :)
 I just drop the donuts in by hand being careful not the touch the hot oil, and I use a large slotted spoon to fish turn them over and fish them out.  You will be surprised how quickly they cook so stay on top of them and do not get distracted.  It will only take a minute or two (depending on how hot your oil is) for the first side of them to brown up...flip them and not more than a minute later take them out.  Don't forget to cook the little donut holes too!

I laid them out on some napkins to kind of soak up some of the oil.  You will want to let them cool enough that you handle them without getting burnt before rolling them through the sugar.  The warmer the donuts are the better the sugar will stick (i.e. MORE SUGAR!)
After you roll them through the sugar...you are done! 
 
The best thing about these donuts is that they are best eaten warm...so you really have to eat as many as you can before they get cold!  LOVE THEM!

Wednesday, February 6, 2013

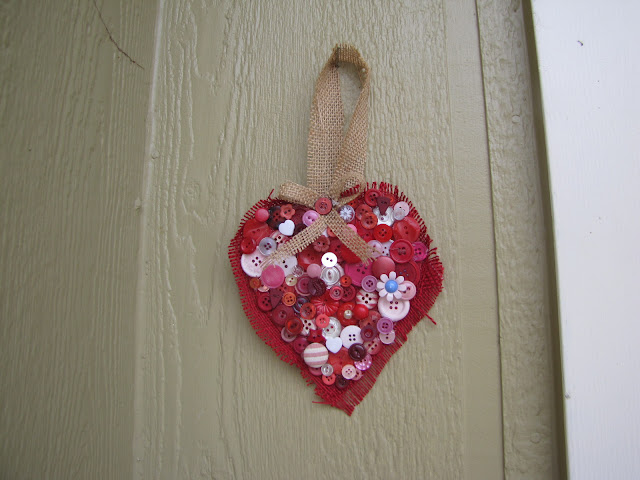
My Heart Belongs to Buttons...

It is no secret that I have a thing for old buttons...I really do not know what it is...the unique beauty of each one, the mystery of the story and age each one, the use of something so practical to make art.  I love them...I really do.

So today I was putting the finishing touches on the Valentine decor around the house...and I really wanted something for the little space next to the front door.   I always have something hanging there, but couldn't find whatever it was that I hung there last February.  On the front door I already have my adorable felt heart wreath I made last year...so I needed something else to go along with it.

I searched pinterest for inspiration, but didn't find anything exactly.  It was just a good way of getting my creative juices flowing...I grabbed a paper plate, some burlap, my trusty glue gun, and my box of buttons.

 This is what I ended up with.  I like it a lot...it is very unique and very detailed.  I think it will be fine hanging outside...it is covered, as long as we don't get some crazy storm.


Sunday, February 3, 2013

Happy SuperBowl!

Just a quick post in honor of the Superbowl tonight...

Hubby was heading out to a Superbowl party and I panicked...What did we have in the house that I could send with him?...NOTHING!  Oh wait I bought a Betty Crocker Gingerbread mix on clearance at Target after Christmas!  And since I have every cookie cutter known to man, (Last fall at a craft fair I won one of those Wilton boxes of 100+ cookie cutters), I knew I had a football cookie cutter.  I am betting you could use an egg shaped cutter and just kind of smoosh the sides into the right shape as you put them on the sheet.

I mixed, rolled, cut, and baked.  Ha!  Does that sound like a reference to an illegal substance to anyone else?  I've been watching too much Breaking Bad and/or Weeds.

Anyway...back on topic.  I made a quick bowl of royal icing for the laces...It only took me about 45 mintues and hubby had a great looking plate of goodies to bring to his party!

I forgot to take pictures until AFTER I wrapped them in Saran wrap and I was not about to undo that annoying process.  So please ignore the saran glare!


Friday, January 18, 2013

Christmas 2012 Awesome Stuff I Made!


 One of my most favorite parts of the holiday season is the opportunities of creating stuff...baking, gifts, ornaments, decor...all sort of fun stuff!


First up...my tree.  Because I have kids and kids come with stuff...I had to trade in my big fat tree for one o those tall skinny ones.  I wasn't sure how I was going to decorate it without it looking VERY clustered.  I have waaay too many ornaments.  Well I finally decided to take inspiration from my woodsy looking star tree topper.  That next week my family and I travel to eastern Iowa for Thanksgiving.  The best thing about travel to the tiny town of Tipton, IA is the AWESOME cute little shops they have lining their main street.  So the day after Thanksgiving...when everyone was watching the big game...I sneaked away to go to the "grocery store".  I am pretty sure my husband knew better.  I hit up Daisy's On The Square.  It was an amazing 30 minutes just wondering around and taking it all in.  I ended up leaving with this really petite grapevine garland....I was REALLY hoping I could make it work on my tree back at home.  I also picked up the adorable grapevine cone tree you can see on the table in one of the pictures below.


The grapevine worked great!  I was so pleased with how it looked on the tree once I got it home!  I continued the woodsy look by tucking in some long pine cones that I had collected in winters past. I also found some cute red berry floral picks and stuck those in all over.

I also took inspiration from this burlap tree skirt tutorial over at Done Over Decor.  It came it out really cute and was pretty easy.
 

My next holiday craft was an advent calendar.  There are so so so many options of DIY advent calendars it was hard choosing what I wanted.  I pursued one of the local craft stores here in town for further inspiration.

I found these tiny vinyl numbers from 1 to 30 and my mind just took it from there....I knew I wanted those little favor tins you see with the wedding supplies, but I couldn't find those until I stopped at Hobby Lobby later.  I grabbed a piece of fiber board, a small stack of Christmas paper, and those vinyl numbers and headed out of the store.
I got the tins, spray painted the board, and used my Fiskars scalloped circle punch and cut out all different circles from the Christmas paper stack.  I put the number on the lids of the tins.  Once the board was dry I used epoxy to glue the bottoms of the tins to the board.  and then used simple craft glue to glue the paper inside each tin.  I drilled two holes at the top of the board and strung some ribbon through it.

This year I had Rolos and pretzels in the tins so that my 3 year old had something to each day she checked.  In later years I may get adventurous and make out those cute little activities slips for each day.  There are so many neat possibilities for this!

Baking, Baking, and MORE BAKING!!!!  I loved these cute little ginger bread trees decorated in white royal icing...they were AMAZING with my morning coffee!
 And because my three year old Hayden has been very obsessed with gingerbread men this year...we made several of them too!


 My three year old and I made these Christmas Cheer shakers for all her aunts and grandmas.  I picked up salt & pepper shakers at the Dollar tree (2/$1).  And all sorts of random little Christmas tid-bits at Hobby Lobby and she had a blast filling them!  Again I am not sure where the credit goes for these, my husband's grandmother had recieved one as a gift several years ago and I stole the idea!


Here are the finished shakers...I printed the tags and spiced them up with a piece of burlap and a jingle bell...and attached wire for hanging.  The tag reads:  
"At this time when we
feel most blessed,
Holidays can make us
feel real stressed.
When the "bah humbugs"
start coming near,
Just shake yourself up
some Christmas cheer!! "
(Sprinkle on others as needed)


 And as gifts for all my Wino friends I made these adorable Cork Reindeer....There are so many versions of these online I am not sure exactly where I saw it first.  They came out super cute!

Wednesday, January 16, 2013

The Very Hungry Caterpillar Party


Here is a VERY late summary of the Very Hungry Caterpillar party I did for Hayden's and Rylan's  joint birthday party last April.  It was so fun to plan and the party went perfectly!  I will try to give as much info as possible for others out there...because I got so much help and inspiration from so many other bloggers out there!  You can check out my Caterpillar Pinterest Board Here.

Here's in the invite I made!  It turned out super cute...I found the graphics from the Polka-dots & Puppies blog.  She some how created all sorts of caterpillar PNG files free for download.  HERE is a link to her FREE DOWNLOAD.  Or if you would like I am always available to create your custom invite!

These sweet little caterpillar barrettes were made by my friend Jen who runs CraftBarn.  They even have TINY little googly eyes!  Each girl got a set of these in their little gift box.


The boys got these necklaces...I got the large beads from this seller on EBAY.  The beads area bout an inch in diameter...though the beads are still in the choking hazard range...they would be much more noticeable if the little one had gotten on in their mouth! No body did so that is good!
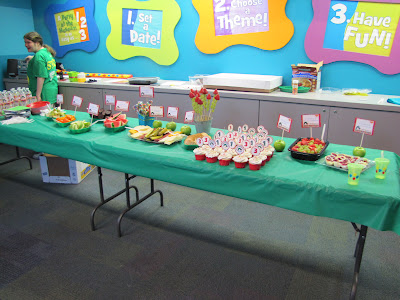
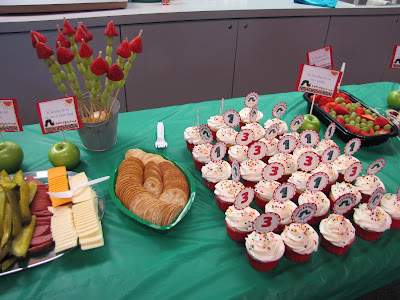
I loved how the food table came together!  I found a free downloaded the food labels from the Polka-dots and Puppies blog.  The cute little leave plates came from Oriential Trading Co. as did the lollipops, the table cloths, and the green gift boxes.
For chocolate cake I used brownie bites... it worked better that way since we were already having cup cakes...I guess we could have done chocolate cupcakes...but oh well...My good friend and AWESOME baker Patti at Tis So Sweet Bake Shoppe made the cupcakes for me.


For the Cherry Pie we did little cherry cheesecakes.

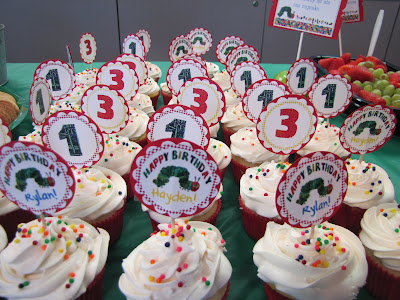
I also created the juice box and water bottle labels and cupcake picks...using the PNG graphics I found.  I can create them for you too! Or you can download the graphics linked above...and create them too!

The gift boxes I got super cheap at Oriental Trading and jsut glued a ribbon to them and created a label for them.


Our activities at the party included: reading The Very Hungry Caterpillar book.  Then we created our own Hungry caterpillars from green soda bottles...that I painted the inside of each bottle red days before the party.  I had all the materials from THIS tutorial available.  They came out very very cute...and the kids loved it!  Just have a helper on hand!  After the caterpillars were created we read the book again...with our caterpillars!

Above is the birthday girl...Below is the birthday boy.  I bought the iron on transfers from this Ebay seller and put them on white shirts we already had.  Easy, and cheaper than all the custom shirts you find on Etsy.


Friday, January 4, 2013

Painting With Fruit

Today the kids painted with fruit...it was an awesome little activity.  Even though the pictures look like it was a huge mess...it really wasn't all that messy!

Here is what you need:  
  • Fruit--I bought a small bag of frozen whole raspberries and one small frozen bag of whole blueberries.  You want to be sure they are not in syrup or any extra juices. 
  • Paper... You could tape down a few pieces to the table covering.  We got this super cool table top paper roll at Christmas it works great for both kiddos working at once!
  • I also always have those cheap plastic table covers on hand for projects such as these...you can get them at the Dollar Tree or after Holiday sales!  When the project is over you can just pitch the table cover...or wipe it down and use it again if the mess is not too crazy!
  • The last thing that is a necessity is some sort of smock for the kiddos...We have these Bumkins long sleeved bibs that work great for all sorts of messy things...but you could always take a plastic trash bag and make a poncho out of it by cutting holes in it for arms and head Just REALLY watch them with these as they could be a choking or suffocating hazard.  Or you could just strip them down and take baths after...
 
 We talked about the different colors that came from each fruit....
 ...and how we could make straight lines or curvy lines.  We dropped the fruit onto the paper to see what it would do...it made cool SPLAT marks.  We also tried to roll the raspberries to make a bumpy dotted pattern...it worked kind of.  We talked about how the raspberries had seeds in them and the blueberries were smooth inside when we squished them.
 It surprised me that Rylan (20 months old) was way more into painting than Hayden (3.5).  Hayden ate most the time.

But she did wonder what it would be like to paint with an orange...so we tried, but she decided it didn't work as well as the raspberries and blueberries.
 We talked about how the more we squished the fruit, the more juice came out and the darker our "paint" became.
 Hayden eventually got into the painting process...
I am letting the artwork dry and then I will see if there are any frame-able pieces of artwork!